-->
INTERFACING CODE:
// Program to blink the LEDs (LEDs are connected to port 2)
#include<reg51.h>
void delay(int time) //This function produces a delay in msec.
{
int j,k;
for(j=0;j<time;j++)
for(k=0;k<1275;k++);
}
void main()
{
while(1)
{
P2=0x00;
delay(30);
P2=0xff;
delay(30);
}
}
LED (LIGHT EMITTING DIODE)
Light Emitting Diodes (LED) is the most commonly used electronic components, generally for display digital states. Typical uses of LEDs include alarm devices, timers and confirmation of user input such as a mouse click or keystroke, events etc. LEDs are very cheap and easily available in a variety of shape, size and colors.
OPERATION OF LED:
The principle of operation of LEDs is simple.
When using an LED you must use a resistor to limit the current flow. If you just connect an LED directly to a pin of the micro controller you run the risk of damaging the micro controller by allowing too much current flow into or out of the pin.
You have to be aware of the current limits for the pin at which you are going to connect LED. A port current limit is the total current flowing from a number of individual pins.
Sinking (power flow into the pin) and sourcing (power flow out of the pin) may have slightly different current limits so you have to check the data sheet for the exact values.
You can use 10-15 mA as a safe LED current which will provide decent light intensity and conserve battery power.
Determine the Series resistor using Ohms law with an excess voltage value and current value for LED.
Red LED's generally need 1.5V to 1.9V to light any extra voltage must be dropped with a series resistor else the LED will draw extra current in an attempt to lower the supply voltage down to the 1.5V level.
The typical supply voltage is 5V. Then, 5 - 1.7 = 3.3V of excess voltage.
Let’s design the LED to use 10mA
Ohms law Resistance R = V / I
3.3 / 10mA = 330 Ohms, Place a 330 ohm resistor in series with the LED.
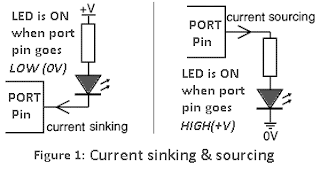
You can connect the LED and its resistor in one of two ways:
Sinking Current where the LED is connected to Positive power and the pin on the micro goes low to ground potential to light the LED.
Sourcing Current the LED is connected to ground and the Pin on the micro controller goes HIGH to positive voltage to light the LED.
CIRCUIT DIAGRAM:
INTERFACING CODE:
// Program to blink the LEDs (LEDs are connected to port 2)
#include<reg51.h>
void delay(int time) //This function produces a delay in msec.
{
int j,k;
for(j=0;j<time;j++)
for(k=0;k<1275;k++);
}
void main()
{
while(1)
{
P2=0x00;
delay(30);
P2=0xff;
delay(30);
}
}
-->


No comments:
Post a Comment